Means that you saved the image in Adobe Wide Gamut.
I think in a raw converter every import is converted to the working color space without notice. There’s no choice.
PL6 offers a choice between 2 working color spaces, after importing.
George
Means that you saved the image in Adobe Wide Gamut.
I think in a raw converter every import is converted to the working color space without notice. There’s no choice.
PL6 offers a choice between 2 working color spaces, after importing.
George
This thread is not about raw conversion.
PL is a raw converter.
George
That doesn’t alter the fact that this thread is not about raw conversion.
Depending on which raw converter is used, the working colour space can be preset or changed when images are displayed. Anyway, a colour space must be allocated unless one wants to fly through the tunnel with headlights off.
DPL’s implementation using WCS as a “tool” has its pros and cons…but I’d prefer to set the WCS in the toolbar above the preview, instead of some of the tools that are there today. The toolbar should be configurable anyway, but that is a different story.
Well, I don’t have PS or AFP so I can’t test it. So I give you just my thoughts.
A raw converter is meant to import raw files, they aren’t RGB files but R,G,B files. In the demosaicing process these channel values have to meet a display color gamut. At this moment that’s unknown so the converter uses a wide color gamut so it’s easy to drop down to a smaller gamut on export, exporting a RGB image. The same happens when importing a RGB image like jpg or tiff. I think the raw converter of Adobe works the same.
PS is not a raw converter. It contains a raw converter , Adobe Camera Raw or ACR. This one is bypassed when you open a RGB image.
PS lets you to change the working color space according to the embedded color space of your imported image. When this is known to PS.
> If the profile is missing or does not match the working space, the application may display a warning message, depending on options you set in the Color Settings dialog box. Profile warnings are turned off by default, but you can turn them on to ensure the appropriate color management of documents on a case-by-case basis. The warning messages vary between applications, but in general you have the following options:
*> *
> (Recommended) Leave the document or imported color data as it is. For example, you can choose to use the embedded profile (if one exists), leave the document without a color profile (if one doesn’t exist), or preserve the numbers in pasted color data.
> Adjust the document or imported color data. For example, when opening a document with a missing color profile, you can choose to assign the current working space profile or a different profile. When opening a document with a mismatched color profile, you can choose to discard the profile or convert the colors to the current working space. When importing color data, you can choose to convert the colors to the current working space in order to preserve their appearance.
If you want to compare PL with Adobe you must compare it with Adobe Camera Raw.
George
Not in this context, here I’m talking about what PL does when it opens a TIFF that has an embedded profile that is not Adobe RGB, and contrasting its behaviour with how PS or AFP open the same file.
To ensure I preserve as much colour accuracy as possible. I have no simple way of knowing the range of colours in the slides I am scanning. They may all fall within the small / narrow gamut defined by sRGB but they might not. To ensure accurate preservation of as many of the colours in the slides as possible the data has to be saved in a file that uses the widest gamut that the scanner can employ. If only a narrow gamut is used then any colour outside of that narrow gamut will be compromised because they have been ‘squeezed’ into the gamut in use.
No, you compared the behaviour of PL withPS and AFP. I don’t know abut AFP but when you compare PL with Lightroom you compare 2 RAW converters. And then there’s no difference between PL and Lightroom. A raw converter is meant to ‘develop’ a raw image. That happens in a rather wide gamut because the wanted output gamut is not known yet.That choice is made on export.
Now back to your scans. Your photo’s are scanned with the hardware of your scanner, in a so called input gamut. On export they are converted to the wanted export gamut. Your choice is a wide gamut. When you open that file in PL that gamut is converted to the wide gamut PL uses. You must find that wonderful.
Exactly what you want.
@platypus ,
Your link shows the differences between different gamuts when send to the monitor without color management. May I add another link that shows the same with color management. Jeffrey Friedl's Blog » Digital-Image Color Spaces, Page 2: Test Images
George
Well, in the widest sense of that comparison I did but my original post makes it clear I am NOT comparing the raw conversion behaviours of these applications.
Feel free to disagree again but I’m not responding to this thread any more.
You compared the behaviour of PL with PS and AFP concerning the ability to choice a variable working color gamut.
In general not possible in a raw converter, but possible in an editor like PS.
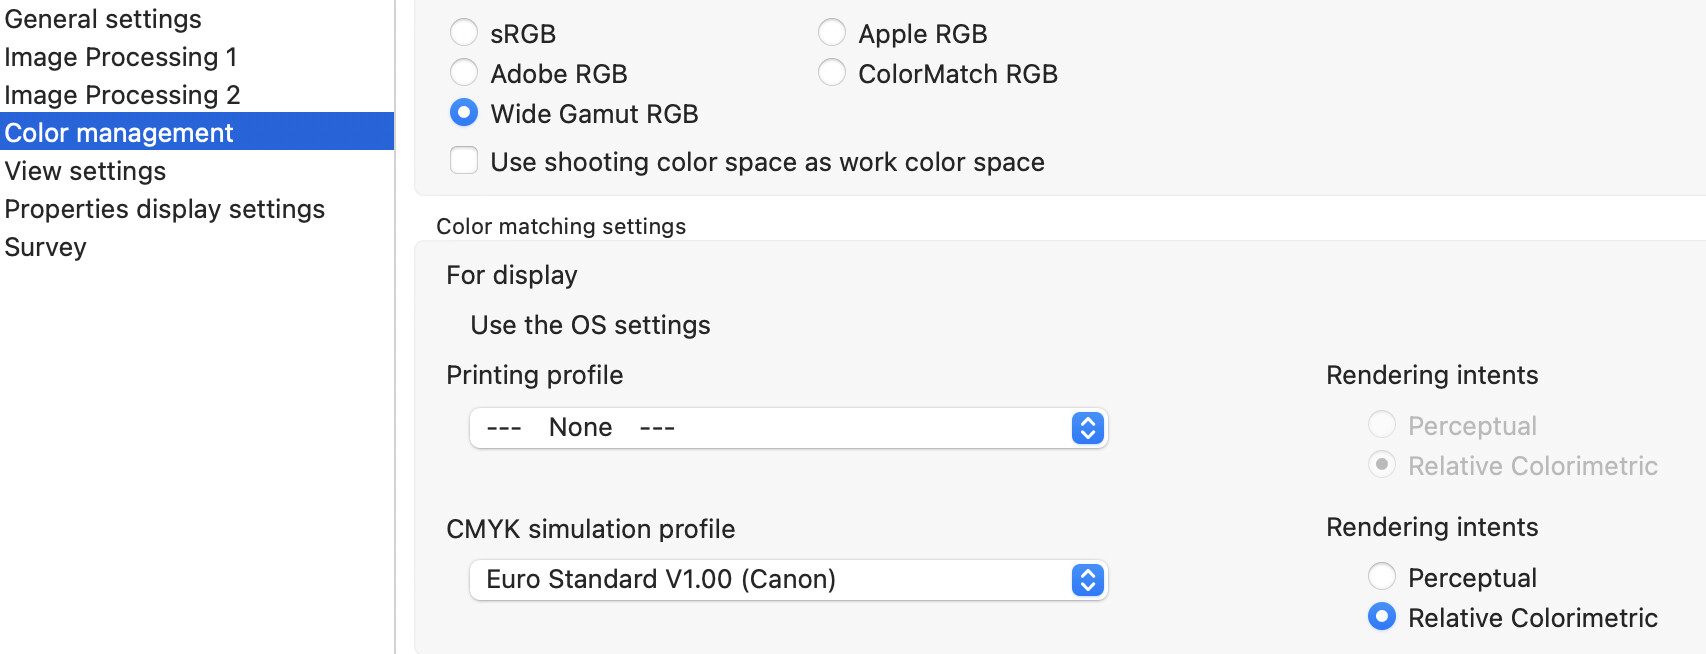
PL6 offers 2 working gamuts.
George
The printer profile is the output device/printers own profile - from the printer/ & paper manufacturer or created yourself. While the CMYK profile is a four color printing press standard profile in combination with a specifik paper etc.
I’m not a Canon user but it’s a common way to have on output device iCC profile - macOS often as you if you want to let the printer itself manage the color output or if you wish to apply an ICC profile of your choice.
The printers profile is to ensure that your color adjustments - while perhaps soft proofing a CMYK profile with 290% ink limit on bulk newspaper - is consistent and correctly displayed on your own printed even if that printer have a way larger gamut then a news paper printing press.
I have updated the diagram to better reflect what we believe is happening for soft proofing.
See this post for the updated diagram V1.2: Colour Management in PL6 - #220 by KeithRJ
Maybe the files don’t have an embedded profile. If they did , you would not have to set something in photoshop and affinity.
The OP wrote
I have a Nikon Coolscan V ED slide scanner. It can work in various colour spaces, the widest of which are two that you can only really use if you are happy to work entirely within the dedicated Nikon Scan software. The widest space that other applications like Photoshop (PS) or Affinity Photo (AFP) know and understand is ‘Wide Gamut RGB’.
If I set the scanner to use that colour space and then …
… so they have an embedded profile.
When I scan 5" x 4" transparencies, I have a calibration target for each film type and I apply the profile I made from that to the scanned file in Affinity Photo. This then “normalises” everything and I can then convert to ProPhoto for all work going forwards.
…maybe the mystery has been solved? ![]()
Ian.
…not sure how I should answer that question…but I welcome the changed wording from “protect saturated colours” to “preserve colour detail”…