Is it possible to add option in exposure compensation adjustment by stop value (e.g. +/- 0, 1/3, 1/2, 2/3, 1 stop)? It can be implemented as buttons (single value in each button) or slider (multiple values on it and only preset value must be pointed).
Click directly on the cursor rail is a subtle and effective method: - RIGHT Click on the rail to the left or right of the cursor for a smooth and controlled progression of the correction in steps of 5 (illustration) - it becomes possible to operate the wheel, arrow and page keys
I tried on the exposition cursor and the only thing I can do is grab the slider or type a value. If I type a value then I can use the up/down key too, the steps will be 0,1.
I’d like to explain my idea in details. What I mean is to have another UI design in additional to existing one to input exposure compensation value. My idea has two different designs.
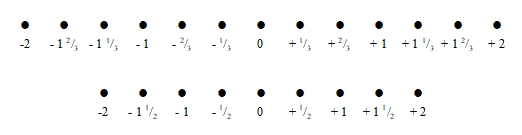
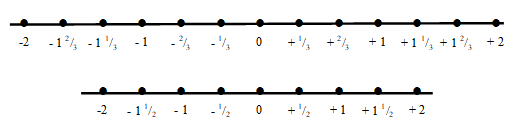
The first one is radio button. Radio buttons of predefined stop values (either in +/- 1/3 stop or in +/- 1/2 stop interval) is shown as below. User just click one of the buttons to select a compensation value. It will speed up the progress.
Another UI design is a slider also with predefined stop values (also either in +/- 1/3 stop or in +/- 1/2 stop interval) is shown as below. User slides towards (to the right) or backwards (to the left) to select compensation value.
For either design, only predefined stop values is allowed to select (i.e. stop values in between is not accepted). The reason of these designs are rapid input a precise value.
Well, you are already allowed to left click/right click, type manually and select from the programmed values. To add the new functionality proposed by you we should see that it is really supported by the other users.
I understand that the precision is 0.1 stop. Of course, it is good if I need a fine precision. My idea is just an additional option for user if he / she need a faster way to set adjustment value if 1/3 or 1/2 stop interval is enough.
As a software engineer, designing UI is part of my job, I understand different people have different need or requirement to do the same thing. I also hope other people can understand me.
The problem, for me and I alone, is that I do not see very well the point of such a request.
I fully understand that this criterion is important when shooting for a controlled exposure, including with the use of the exposure corrector.
But for demosaicing / post processing, it represents nothing other than an arbitrary value which certainly does not guarantee the correct correction. The right correction is what it is, depending on the result you want to obtain.
Well, after that, this is only my opinion and we have the right to disagree.
Everyone has right to express his / her idea, that’s not a problem. For me, I just want to raise an idea to have another UI in addition to existing ones, instead of replacing any of them. As I said, different people may have different ways to do the same thing. In fact, same person may also desire different ways to do the same thing in different scenarios. Being a software engineer, designing UI to improve UX (user experience) is part of my job.
For example, if I want to adjust exposure by 1 1/3 stops, I have to either input 1.3 directly or slide the slider to the right and stop at 1.3 or right-click 4 times on slider. My idea is what if a pre-set scale exists, I just need to click the radio button of “1 1/3 stops” one time and get what I need. It’ll make the operation easier and faster, provided that I don’t need to have a 0.1 stop precision.
The most important point is that I’m not going to replace any existing UI but add an alternative option for user to choose.
I’m not sure what the point is in having an “accurate” exposure correction. A better idea would be to get the exposure right in the camera
With many years of experience in film (35mm, medium format and 5" x 4"), I learnt to get the best possible exposure in order to stand the best chance of getting a good print. Now, with digital, those same techniques apply, except exposures are highlight-led rather than the shadow-led approach for B&W negative film.
Even with all my technical experience and with the best possible exposure in the camera, there are still times when an image might not quite feel right. But, in many years of experience in digital photography, I have never needed to specify an “accurate” correction, simply because it is impossible to tell by how much the original exposure is off.
It is far more often a case of “tweaking” it until it feels right. I’m sorry but, personally, I can’t see the point behind or the need for your request.
I see, but let me just ask another sub-question: why do you want precisely chose a +/- EV value used by most cameras, instead of freely moving the slider and/on using steppers and/or entering a value?
On a camera, the smallest EV increments are usually 1/3 EV. This is a good compromise that allows you to slightly change the exposure with small enough increments…When editing those shoots in a RAW editor like PL (and the others), you have the option to further adjust your exposure with better control (and smaller increments).
So, why “do you force yourself” to translate the “camera way” into your “editing workflow”…To me (but, again, I’m here to understand your point of view, not to judge or anything) a user “should only” look at his image in PL and adjust (if needed) the exposure…
Do you prefer using 1/3 increments because you feel more comfortable with…likely because you are already used to them (like when shooting with your camera)?
I’m not forcing to adopt “camera way” into “editing workflow”. For example, if I think 1 1/3 stops should be adjusted by looking, I want to have a shortcut to get it by single click rather than multiple clicks. Of course, when I need more precise adjustment, direct value input or sliding slider would definitely be a better option.
Do you know of any processing software that does this already? In many years experience, I have never come across it, or even missed having it.
But all you’ve got at the moment is a single click and slide if you ignore the stepper control
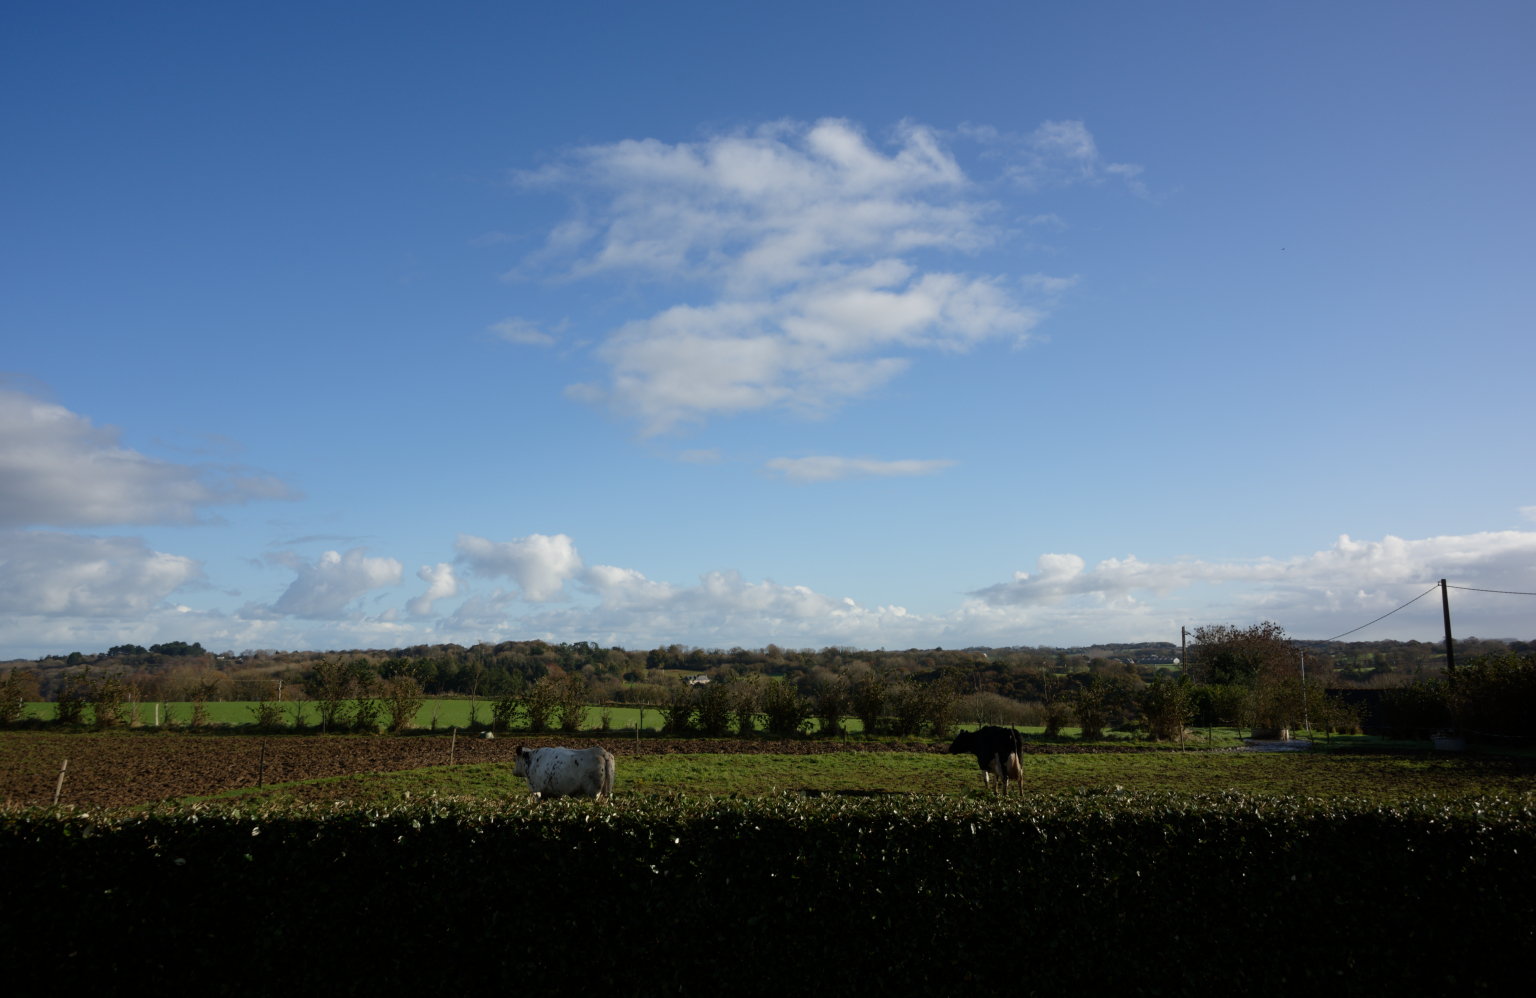
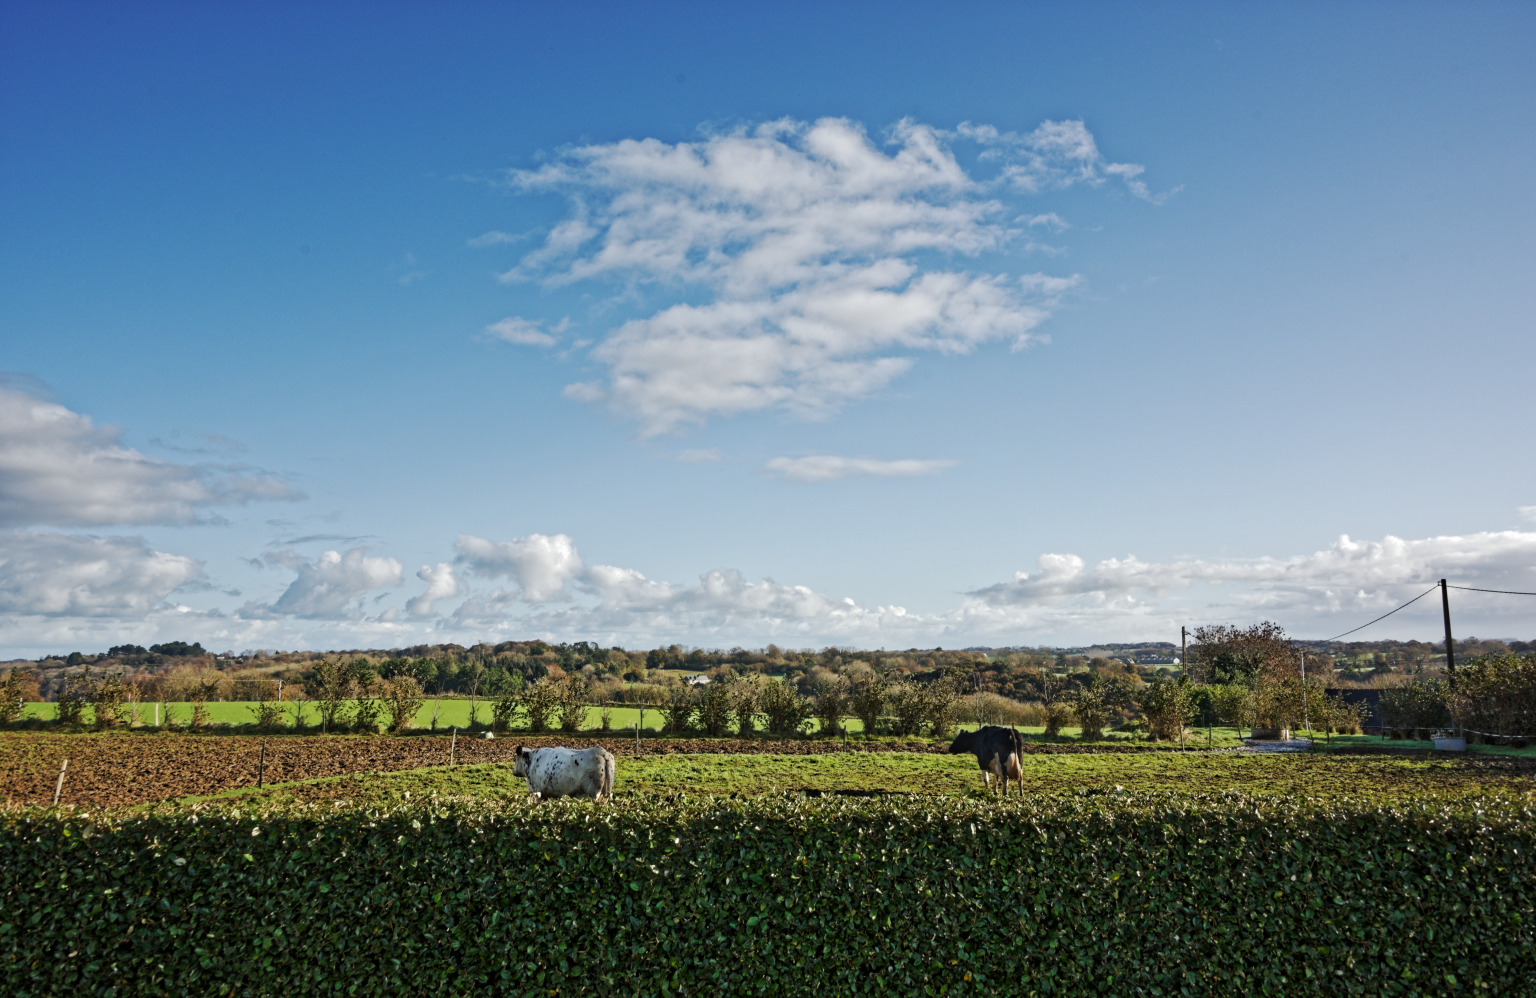
By way of an example, here is an image I just took. It is perfectly exposed to have the highlights on the clouds as bright as possible without blowing them. The shadows fall where they will but with 14 stops of dynamic range, they are definitely recoverable.
The answer is - I didn’t touch the exposure compensation, because the exposure was perfect. What I did do was to use spot mode smart lighting to fill the histogram properly, applied a slight ‘S’ tone curve, added a slight graduated filter to the sky to add a bit of ClearView Plus and adjusted micro-contrast and shadow contrast.
In this case, and in many others, once you have used smart lighting, you very rarely need to adjust the exposure. Adjusting exposure simply moves the entire dynamic range either to the left or the right; more often, what is needed is to redistribute the range to better fill the histogram, which is where tools like Smart Lighting come in.