Is there an Upgrade coming this year to compete with the new to be released Luminar AI?
Don’t think DxO have to even try to compete with Luminar. PhotoLab is far superior already and is aimed at the more professional market whilst Luminar is more for the quick fix type. Luminar can be used as an external editor to PL anyway or at least Luminar 4 can.
2 Likes
Elaborate please.
Toolset amount?
Image quality?
Denoising quality?
Highest price?
If you need to compare, do DxOPL suite elite (with viewpoint and filmpack elite) including NIKcollections.
Why?
PL elite has benefit from VP and FP in more then just prespective and filters.
The suite is a image improving package with some creative features wile NIK is filter based to be creative.
Just comparing new stuff doesn’t mean that the most new things is better then less.
So what are you looking for?
Hi Peter.
Thanks for the request.
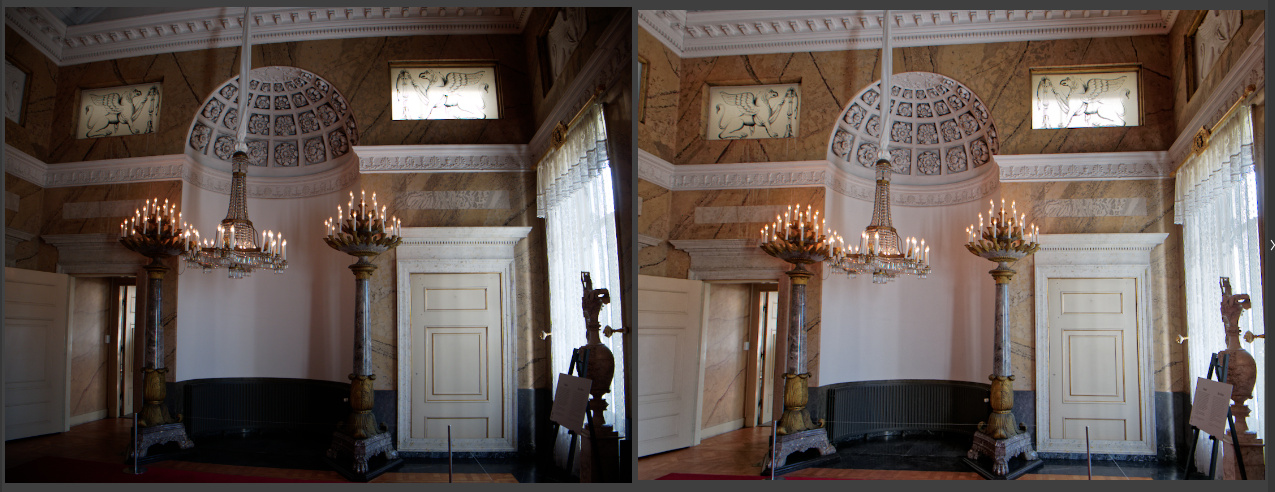
At the moment the majority of my shooting is definitely in indoor real estate photography. On a dull day, no problem. Other than the windows, no real problem. At this time in my career and life, being creative here is not necessary, not that some of the filters applicable may be the thing to spark up an image. Since I am not trying to create just a photo or two for a magazine, for example, the fact that I am dealing with numerous rooms and windows in a property shoot, having the ability to quickly treat those specific areas is rather important in order to excel and not lose money. I don’t do a lot of million dollar homes in the central Massachusetts area.
Next to windows, having the ability to easily do a sky replacement on those dull or rainy days is also necessary and demanding. I can’t find anything in my toolbox with DxO to accomplish that.
There are times for my own use I will shoot an occasional portrait or more likely a seascape or landscape when I can find it worthy and where I may want to be creative. I use to shoot in HDR with multi-imaging (3X), then went to a procamera that stitched internally but had limitation on the stretch of exposure settings, and now using one-shot RAW.
I have tried the DxO trial and after about 10 days found it had the rest licked. I have used at least a handful of other applications including Cyberlink PhotoDirector, Affinity Photo, Sylum HDR, currently Luminar 4 (and a couple of others). I stumbled upon DxO during some research for the best photography editing software without a subscription. My current thought would be to bite-the-bullet on pricing and get the DxO Photolab Elite and the ViewPoint adder specifically for the correction it provides for vertical lines for wide-angle lenses. I honestly feel the architectural correction should have been incorporated into Elite.
So I know Luminar 4 is coming out with a fully AI application to replace itself going forward and will be released this Holiday season. They already have sky replacement which works very well. My concern also pertains to if DxO is doing the same in releasing a new version this last quarter, purchasing it now may be premature if a replacement is coming up like most nonsubscription applications do, and I pay twice to be current. So I am on the fence until December.
So there you have it. Perhaps sorry you asked? 
Hi Fred
No not at all, now i know that you did some homework and what you are looking for. 
I wil try to answer as best as possible:
about new features which are in V4, you have to wait for the official release in last quarter of the year.
(October) i can’t reveal anything.
if you have some example’s in raw format we can see if dxo is working for you.
look at this thread for some clue’s:
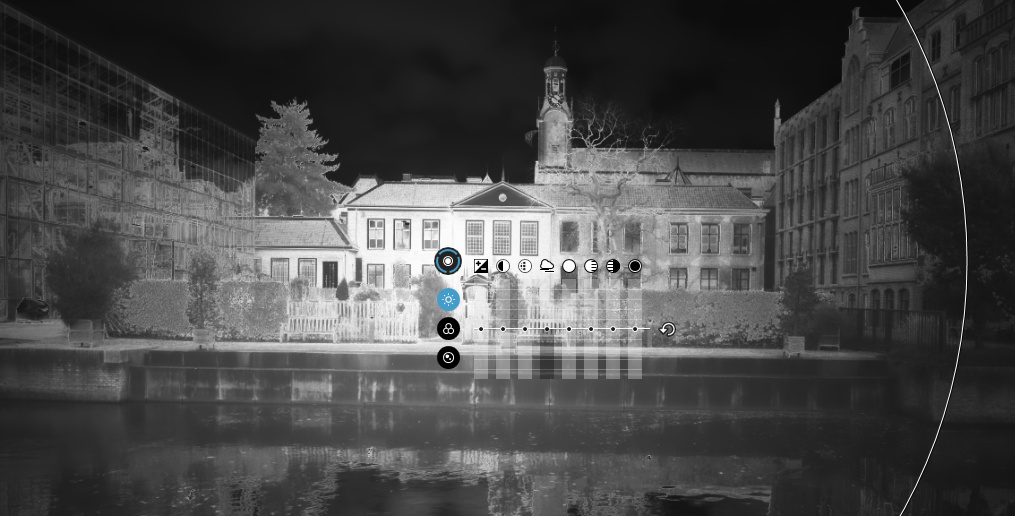
Quick exposure correction video link:
Something like this?
when you learn to use the controlpoints it’s rather simple.
there are negative control points which allow you to mask out the selected mask.
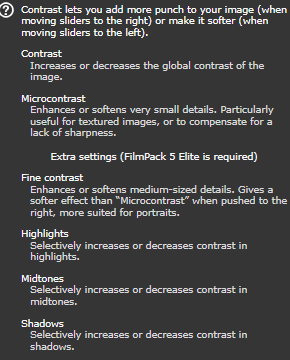
when you have filmpack you have highlight dedicated contrast to avoid greyisch artefacts when tuning down highlight.
video to explain
Sky replacement: nope not there. that’s pixel editor area. photoshop ,PSE, and such. See this thread.
Honestly i find the suite version one application. DxOpl elite including FP and VP are one.
FP has some non creative tools which can help out in just exposure correction.
My advise is buy the Suite Elite if you decide to go with DxOPL.
Yes don’t be hasty.
the trials keep working only by export you get a watermark across it after 30 day’s so training and discovering how to handle and work with it is after 30 day’s still posible.
Remember the power of controlpoints is amorfe masking. and it select color and luminance as selectionpixel.
See @Pieloe 's excelent tutorial.
The fine detail on underexposed area’s in dxopl are great with Prime.
Maybe by underexpose a bit due use of ETTR. (zebra’s?) and shadow lifting instead of highlight suppressing you get better results. (washed out color can only be replaced not recovered.)
Fast Raw Viewer can help you finding the sweetspot of your camera’s sensor.
just underexpose that much the highlight is inside the Dynamic range of the sensor.
Have fun!
1 Like
Seconded. PL3’s ability to capture sharp detail even in noisy images is without peer, in my opinion.
1 Like
True - PhotoLab does not do this, explicitly - but I find the following can be quite effective;
- Use Local Adjustments - and apply a Graduated Filter to the sky
- If the sky is a bit too “bright” - then reduce Highlights a little
- Add some ClearView and increase Vibrancy
It’s not exactly what you’re looking for … but the result can be quite good (and without the “dodgy edges” that sometimes result when a sky is replaced).
John M
This reminds me of one of the new features coming in ON1 2021. You can apply a graduated filter and then restrict it by picking a colour and a range around it. E.g. set the filter over the sky area and then restrict it to the blues in the sky.
I do this with Viveza already 
1 Like
I am a total noob in NIK, ( most things i can handle in PL.)
Could you show me, us, how you do that?
That’s a function i would use. I am on free dxo v2 by the way
1 Like
Colour range masking has been in Lr for a while now. You can sort of achieve it with control points but it is not the same
Agree. Control points in PhotoLab are powerful but there is a limit in terms of what they can do. Expanding control point functionality to allow changes in the shape of the circle, with precise control over a gradient and additional control options could make it into an extremely powerful tool which could allow it to compete with multiple tools from other products.
Mark
1 Like
Yes it is a shame the erase brush does not work with control points, or I cannot make it do so anyway. Works fine with the gradient filter. I suspect the logic is that control points are modified via the use + or - control points.
Two total different forms of layers.
brush/gradient/autobrush(hybrid)/ multibrush are global layers non color/luminance related.
painting over something is just painting equal strenght on all hue.
Autobrush has by first contact a form of “colorpicker” mode. You can select a color and the second “autocircle” is scanning for this color to add to the mask. hence the auto function. depends heavily on “edges” and color change.
controlpoints are having a selection point of color luminance/brightness and every pixel which is the same is "white masked"and every pixel which is looking the same is greyisch in a sliding scale.
all other is 0% selected and thus black.
much wider selection by “smart AI”
That why erasor is difficult, how much effect do you like to have on a 25% match?
A control point is basically no more than a Lr radial filter with colour range masking enabled. You can erase parts of the radial mask (colour range or luminosity range enabled) in Lr with the erase brush. That applies irrespective of whether the mask is normal or inverted. Radial Filters are very powerful.
Don’t have LR.
Does the radial filter have the same flames/ clouds/ amorfe masking as a controlpoint has?
Not sure what you mean by that Peter but I have found nothing a control point does that a Lr radial mask cannot do. In fact Lr is capable of masking over a range of hues via selecting multiple points. The added bonus with the radial is that you can have mask inside or outside the selected circle - I say circle but you can stretch it into an oval as well. Then we have its function as a luminosity mask or just a standard area to edit
If you select “M” mode black and white selectiongrid you see
those white /grey/ darkgrey fields/area’s
interesting, can you make some screenshots to show me?
I am away boating at the moment, Peter, and do not have access to my Mac. But yes you see a representation of the mask in a similar way. You can also add to / subtract from that mask using the erase brush which can be set at different densities.
This might help, Peter. A bit high level but it gets the idea across.
1 Like